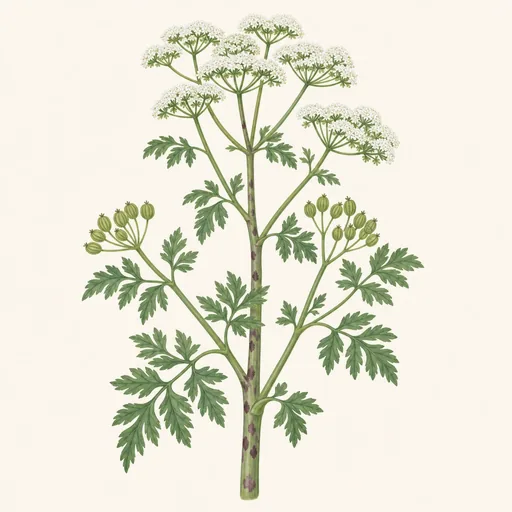
Hemlock
Conium maculatum · Pinaceae
- Plant outFrom 4 weeks before the last frost until the last frostMar 13 – Apr 16
- Plant in autumn6–8 weeks before the first autumn frostAug 30 – Sep 19
- Space6–10 m (20–33 ft) apart
Description
Hemlock refers primarily to two notorious plants: the water hemlock (Cicuta species) and poison hemlock (Conium maculatum). Both are known for their toxic properties and should be approached with caution.
Water Hemlock: This plant is often found in wet areas such as marshes, meadows, and along streams. It features tall stems, typically ranging from 3 to 6 feet, with branching clusters of small white flowers. The leaves are complex, with a jagged, fern-like appearance. This plant is one of the most poisonous in North America, containing potent toxins that can be fatal to humans and animals if ingested.
Poison Hemlock: Commonly associated with the death of the philosopher Socrates, this biennial plant can grow up to 10 feet tall. It has hollow stems marked with purple spots and produces clusters of white flowers similar to those of Queen Anne's lace. The leaves are also finely divided and resemble those of parsley. Like water hemlock, poison hemlock contains toxic alkaloids, primarily coniine, which can cause respiratory failure if ingested.
Both plants thrive in disturbed areas and are often found near roadsides or in fields. It is crucial for gardeners and outdoor enthusiasts to identify these plants accurately and avoid any contact or consumption due to their high toxicity. If you're cultivating a garden, steering clear of introducing these species is advisable for safety.
Growing Conditions
12–21 m (39–69 ft) tall, 6–10.5 m (20–34 ft) wide
- Smallest
- Largest
Part shade
Tolerates full sun, part sun, full shade
Moderate
Keep evenly moist, not soggy.
Survives down to −40 °C (−40 °F)
pH 5–6.5 · acidic
Where it Grows
Planting
When to Plant
Understanding Hemlock Varieties
There are two primary types of hemlock, the Eastern Hemlock (Tsuga canadensis) and the Western Hemlock (Tsuga heterophylla). Both are evergreen conifers that can thrive in various conditions, but the timing for planting may vary slightly based on local climate and specific species characteristics.
Optimal Planting Times
-
Spring Planting:
- Early spring is one of the best times to plant hemlock, particularly as the soil begins to warm and thaw. This timing allows the roots to establish before the heat of summer sets in. Aim to plant between late March and early May, depending on your local climate.
- Look for the emergence of buds and the warming of soil temperatures to gauge the right time for planting.
-
Fall Planting:
- Fall is another favorable time for planting hemlocks, ideally between late September and October. Planting in the fall allows the tree to focus on root development before the cold winter months.
- In regions with milder winters, fall planting can result in stronger, more established plants by the time spring arrives.
Climate Considerations
-
Soil Temperature: Hemlocks prefer cool, moist conditions. Ensure that the soil temperature is consistently above 50°F (10°C) for optimal growth. Testing soil temperature with a soil thermometer can be beneficial.
-
Frost Dates: Be mindful of your local frost dates, as hemlocks should be planted after the last frost in spring and allow sufficient time to establish before the first frost in fall.
Site Preparation Prior to Planting
- Location: Choose a site with partial shade to full shade, as hemlocks thrive in conditions that mimic their natural forest habitat.
- Soil Quality: Hemlocks prefer well-draining, acidic soils rich in organic matter. It’s beneficial to test your soil pH and amend as necessary to ensure ideal growing conditions.
Conclusion
Knowing when to plant hemlock involves understanding the specific requirements of the species, the local climate, and seasonal conditions. Whether you choose to plant in spring or fall, proper site and soil preparation will be crucial to ensure the healthy establishment of your hemlock trees. Always monitor local weather patterns and adjust your planting schedule accordingly for the best results.
How to Plant
Planting a Hemlock, specifically the Eastern Hemlock (Tsuga canadensis), requires thoughtful preparation to ensure its healthy establishment. First, select a planting site that offers partial to full shade, as these trees thrive in cooler, shaded areas with well-draining, moist, acidic soil.
Begin by preparing the planting hole, which should be about twice as wide as the root ball and equal in depth. This encourages root expansion while preventing the tree from becoming root-bound.
Before placing the Hemlock in the ground, gently tease out any tightly-bound roots. Place the tree in the hole so that the top of the root ball is level or slightly above the surrounding soil. Backfill the hole with native soil while ensuring that no air pockets form; this can be done by gently tamping the soil as you go.
Water the tree thoroughly after planting to help settle the soil and eliminate air pockets. A 2- to 3-inch layer of mulch around the base will help retain moisture and suppress weeds. Regular watering in the first few years is crucial to help the Hemlock establish strong roots, especially during dry spells.
Planting Calendar
- Plant outdoors: from 4 weeks before the last frost until the last frost
- Autumn planting: 6–8 weeks before the first autumn frost
- Plant out: Mar 13 – Apr 16
- Autumn planting: Aug 30 – Sep 19
Care
Care Calendar
- Prune · Feb 27 – Apr 2
Remove dead or damaged branches, avoiding hard cuts into old, bare wood. - Mulch · Apr 10 – May 14
Renew a 2–3-inch layer of organic mulch, keeping it clear of the trunk. - Protect · Oct 11 – Nov 14
Shield young trees from drying winter wind or deer browsing where needed.
Watering
When watering a Hemlock plant (Tsuga spp.), it is crucial to mimic its natural habitat, which thrives in well-drained, moist environments. The best strategy begins with assessing the soil moisture; Hemlocks prefer consistently moist soil but can suffer from root rot if overwatered.
Water the plant deeply to encourage deep root growth, aiming to keep the soil evenly moist during the growing season, which typically lasts from spring to early fall. Use a soil moisture meter or your finger to check the top 2 inches of soil; if it feels dry, it's time to water.
During dry spells or hot weather, monitor the plant closely, as Hemlocks can exhibit stress signs like browning needles. In winter, reduce watering as the plant enters dormancy, ensuring the soil does not become waterlogged. Overall, aim for a careful balance, promoting healthy growth while avoiding excess moisture.
Pruning
Pruning a Hemlock (Tsuga spp.) is best approached with caution and care, as these trees are sensitive to over-pruning. The ideal time to prune Hemlock is during late winter to early spring, just before new growth begins. This timing minimizes stress and promotes healthy recovery.
Begin by removing any dead, damaged, or diseased branches to maintain the plant’s health. Focus on thinning areas that appear dense, allowing for better light penetration and air circulation. When shaping the tree, aim for a natural appearance rather than a formal hedge; avoid cutting back into old wood, as Hemlocks may not regenerate foliage from these areas.
Use sharp, clean pruning shears for clean cuts, which help prevent injury. For larger limbs, consider using a saw. Always step back periodically to assess the overall shape to ensure a balanced look. This gentle approach supports the Hemlock's natural beauty while keeping it healthy.
Weeding
Weeding around Hemlock (Tsuga) plants requires a careful approach to avoid damaging their shallow root systems. The best strategy is to use a combination of manual and mulching techniques.
Begin by wearing gardening gloves and using a hand weeder or trowel to gently remove weeds by the root, taking care not to disturb the Hemlock’s roots. Focus on weeds that are directly competing for nutrients and water.
After eliminating the weeds, apply a layer of organic mulch, such as shredded bark or pine needles, around the base of the Hemlock. This will suppress future weed growth, retain soil moisture, and provide nutrients as the mulch breaks down.
Regularly monitor the area for new weeds, especially in the growing season, to maintain a healthy environment for your Hemlock. Remember to practice good garden hygiene by composting any removed weeds to prevent seed spread.
Mulching
Mulching is an essential practice for promoting the health of Hemlock (Tsuga spp.) plants, especially in garden settings. The best strategy involves applying a 2-4 inch layer of organic mulch, such as shredded bark, pine needles, or wood chips, around the base of the plant. This not only helps retain soil moisture but also regulates soil temperature and suppresses weeds.
To mulch effectively, start by clearing any grass or weeds from the area around the Hemlock. Then, ensure that the mulch is kept at least a few inches away from the plant's trunk to prevent rot and allow for proper air circulation. Mulching is best done in early spring or fall, as these times align with optimal moisture levels and temperature fluctuations.
Regularly check and replenish the mulch as necessary, especially after heavy rains or wind, to maintain its effectiveness and ensure continued protection for your Hemlock.
Fertilizing
Fertilizing Hemlock plants (Tsuga spp.) requires a balanced approach to support their health without over-fertilizing, which can harm their delicate root systems. The best strategy involves using a slow-release, balanced fertilizer with equal parts nitrogen, phosphorus, and potassium, such as a 10-10-10 ratio. Fertilization should ideally occur in early spring, just as new growth begins, ensuring nutrients are available during their active growing season.
Additionally, incorporating organic matter, such as well-rotted compost or mulch, will provide essential nutrients while improving soil structure and moisture retention. It's crucial to conduct a soil test before fertilizing to determine existing nutrient levels, allowing for tailored amendments. Generally, avoid fertilizing Hemlocks in late summer or fall, as this can encourage new growth that may not harden off before winter, leading to damage. Regularly monitor the plant's health and adjust your fertilization strategy as needed.
Growing in Containers
Not well suited to growing in pots.
Propagation
From seed
- Collect mature cones in autumn before they open.
- Dry the cones and remove the seeds.
- Chill the seeds in a moist medium for about 60 to 90 days.
- Sow shallowly in a moist, well-drained seed mix.
- Keep seedlings shaded and evenly moist.
From cuttings
- Take semi-hardwood cuttings from a young tree in late summer.
- Remove the needles from the lower stem.
- Dip the cut end in rooting hormone.
- Insert it into a moist, free-draining rooting mix.
- Keep it humid and out of direct sun until roots develop.
Common Problems
- Yellowing leaves
- Sticky residue on leaves
- Black sooty coating
- Stunted growth
Scale insects are small, sap-feeding insects that settle on garden and houseplants. Adults often look like bumps on…
- Pale speckles or stippling
- Yellowing leaves
- Brown or crispy leaf edges
- Fine webbing
Spider mites are tiny, plant-feeding arachnids in the family Tetranychidae, not insects. Several species attack garden…
- Yellowing leaves
- Wilting
- Stunted growth
- Leaves dropping
Root rot is a general name for the decay of plant roots, not a single disease with one scientific name. It can result…
- Stems chewed or cut through
- Stunted growth
Deer are browsing mammals that feed on many garden plants. “Deer” refers to several species in the family Cervidae…
Varieties
Forms a slow-growing, nest-shaped mound with a depressed center.
- dwarf
- mounding
- shade tolerant
Its size and shape depend on whether a central leader is staked.
- weeping
- spreading
Produces creamy-white new growth that shows best in partial shade.
- variegated
- compact
Spreads low across the ground or drapes over a wall.
- prostrate
- slow growing
Has pale spring growth on a compact, rounded plant.
- dwarf
- variegated
More about varieties
The Hemlock plant, primarily known for its toxic properties, belongs to the family Apiaceae. There are several species and varieties of Hemlock, with the most notable being Conium maculatum, also known as the Common Hemlock. Below are some of the most recognized varieties of the Hemlock plant:
1. Common Hemlock (Conium maculatum) This is the most widely known species of Hemlock. Common Hemlock is characterized by its tall stature, typically growing between 3 to 10 feet tall, and has a distinctive spotted stem. The plant produces small white flowers arranged in umbrella-shaped clusters (umbels). It is native to Europe but has become widespread in North America, often found in moist, disturbed areas.
Key Characteristics:
- Height: 3 to 10 feet
- Flowers: White, in umbrella-shaped clusters
- Habitat: Prefers damp areas, often found in meadows and along roads
2. Water Hemlock (Cicuta species) While not a true Hemlock, the Water Hemlock is often confused with Conium species due to its similar appearance. It is known for being one of the most toxic plants in North America, with several species, including Cicuta maculata (Eastern Water Hemlock) and Cicuta douglasii (Western Water Hemlock). The plant grows near water sources and has a more robust growth compared to the Common Hemlock.
Key Characteristics:
- Height: Varies, often reaching up to 6 feet
- Flowers: Small, white, clustered in umbel shapes
- Habitat: Typically found in wetland areas
3. Poison Hemlock (Conium maculatum var. variegatum) This variety of Common Hemlock has variegated leaves and is often found in similar habitats. The variegation does not reduce its toxicity and maintains the same dangerous compounds present in its more common relatives.
Key Characteristics:
- Height: Similar to Common Hemlock
- Flowers: White, in typical umbel clusters
- Leaves: Variegated, making it visually distinct
4. European Hemlock (Tsuga canadensis) Although primarily a member of the pine family (Pinaceae), the European Hemlock’s name may lead to confusion with Conium species. It is important to note that it is not related and is not toxic like the Conium varieties. European Hemlock is a true conifer, known for its ornamental value in gardens and wood production.
Key Characteristics:
- Height: Up to 100 feet in optimal conditions
- Leaves: Needle-like foliage
- Habitat: Prefers well-drained soil and partial shade
Safety Considerations It is crucial for gardeners and hobbyists to recognize the dangerous nature of certain Hemlock varieties, particularly Common Hemlock and Water Hemlock, as they contain toxic alkaloids that can be fatal if ingested. Caution should be exercised when working in areas where these plants are present, and proper identification is essential to avoid accidental poisoning.
In conclusion, while several species and varieties of Hemlock exist, they carry significant risks due to their toxicity. Understanding their characteristics helps in identification and promotes safer gardening practices. Always consult local botanical guides and experts when encountering unfamiliar plants in the garden.
Health Benefits
It is crucial to clarify that while hemlock (genus Conium) is a well-known plant, it is not associated with health or wellness applications in a positive context. In fact, hemlock is highly toxic; its ingestion can lead to severe poisoning, paralysis, and often death. Historically, hemlock’s most notorious use was as a method of execution in ancient Greece, notably the death of Socrates.
The plant contains potent alkaloids, primarily coniine, that disrupt the central nervous system's function. There are no safe or beneficial health applications for hemlock due to this toxicity. Instead, any purported medicinal properties found in historical texts should be approached with extreme caution and skepticism.
In the realm of herbalism and natural remedies, hemlock is overwhelmingly viewed as a dangerous plant, far removed from any wellness connotations. For those interested in herbal applications or improving health through plants, alternative medicinal herbs with safe benefits should be explored, such as chamomile or echinacea. It is essential to gain a comprehensive understanding of each plant's properties before considering their use in any health or wellness context.
Fun Facts
-
Toxic Nature: Hemlock, particularly the Western and Poison Hemlock species (Conium maculatum), is notorious for its toxicity. The plant contains alkaloids that can cause severe respiratory failure and even death if ingested, making it one of the most dangerous plants in North America.
-
Historical Significance: Hemlock is famously associated with the trial and execution of the philosopher Socrates in Ancient Greece. He was sentenced to death and forced to drink a concoction containing hemlock, which was used as a method of capital punishment at the time.
-
Distinguishing Features: Hemlock is easily recognizable by its tall stature (up to 10 feet), hollow stems with purple spots, and delicate white flowers that cluster in umbrella-shaped arrangements known as umbels, similar to those seen in other members of the carrot family.
-
Habitat Preferences: This plant typically thrives in moist, disturbed areas such as fields, roadsides, and riverbanks. Its preference for rich, moist soils makes it common in both rural and urban environments across much of its range.
-
Historical Uses: Despite its toxicity, hemlock has been used historically in herbal medicine for various ailments. However, due to the fine line between therapeutic doses and toxicity, its use has largely been abandoned in modern herbalism and medicine.
These fun facts highlight the complexity and dual nature of hemlock, revealing both its perilous characteristics and its historical context.
Notice an error or have a question about Hemlock? Contact us