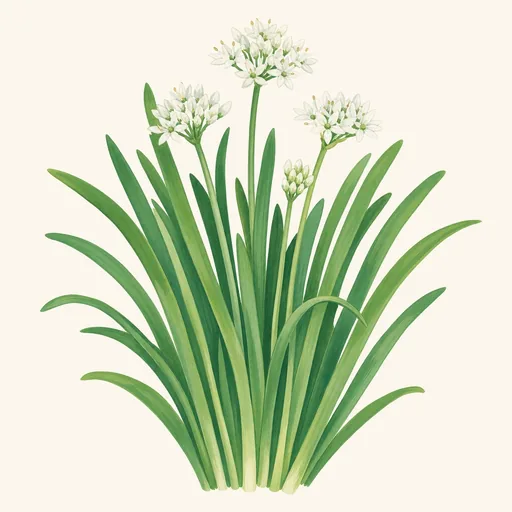
Garlic Chives
Allium tuberosum · Amaryllidaceae
- Start indoors6–8 weeks before the last frostFeb 13 – Mar 5
- Sow outdoorsFrom 2 weeks before to 2 weeks after the last frostMar 27 – Apr 30
- Plant outFrom the last frost until 2 weeks afterApr 10 – Apr 30
- Space15–30 cm (6–12 in) apart
- Harvest60–90 days after plantingJun 9 – Aug 19
Description
Garlic chives are a perennial herb grown for their mild, garlicky leaves. Unlike common chives, their leaves are flat rather than hollow and round. They grow in dense clumps from small, slender bulbs, usually reaching about 30–60 cm (12–24 in) tall when in flower. In late summer or early autumn, upright stems bear rounded clusters of small, white, star-shaped flowers. The flowers attract bees and other pollinators.
Native to eastern Asia, garlic chives are cultivated in gardens and farms across many parts of the world. Their leaves are used fresh or cooked in stir-fries, dumplings, soups, egg dishes, and sauces. The unopened flower buds and open flowers are also edible. Leaves taste more like gentle garlic than onion; cooking softens their flavor further. Cut leaves close to the base as needed, and use them promptly for the best flavor.
Garlic chives grow best in full sun to partial shade and fertile, well-drained soil. Water during prolonged dry spells, especially when harvesting regularly. Established clumps tolerate cold weather and regrow after their leaves are cut. Divide crowded clumps every few years to keep them productive. Plants can also be grown from seed, although seedlings take longer to form substantial clumps.
Flower heads produce many seeds, and garlic chives may spread readily where conditions suit them. Removing spent flowers before seeds mature helps prevent unwanted seedlings. For a steady supply of tender leaves, harvest regularly but allow the plant time to regrow between cuts. In cold climates, the foliage may die back in winter and return in spring. Like other members of the onion family, garlic chives should be kept away from cats and dogs, for which they are toxic.
Growing Conditions
30–60 cm (12–24 in) tall, 20–40 cm (8–16 in) wide
- Smallest
- Largest
Full sun, 4+ hours
Tolerates part sun, part shade
Moderate
Keep evenly moist, not soggy.
Ideal 15–25 °C (59–77 °F)
Survives down to −40 °C (−40 °F).
pH 6–7.5 · neutral
Where it Grows
Planting
When to Plant
Plant garlic chives in spring, once the soil is workable and the danger of hard frost has passed. For an earlier start, sow seeds indoors about 6–8 weeks before your last expected spring frost, then move the seedlings outside after gradually acclimating them to outdoor conditions. Direct-sown seeds germinate best when the soil has warmed to around 60–70°F (15–21°C); in cold, wet soil, germination may be slow or uneven. Established clumps can be divided and replanted in early spring, as new growth begins. Early fall is another good time to plant divisions where there are several weeks for roots to establish before the ground freezes. In mild climates, fall can also be a suitable time to sow seed. Avoid transplanting during intense summer heat, when young plants dry out quickly. If you want a steady supply of leaves, allow time for seedlings to form a substantial clump before harvesting heavily.
How to Plant
Choose a spot with full sun or light partial shade and fertile, well-drained soil. Garlic chives tolerate some shade, but produce more leaves in sun. Loosen the soil and mix in compost if it is compacted or poor; avoid sites that stay waterlogged. For direct sowing, scatter seeds thinly and cover them with about ¼ inch (6 mm) of soil. Water gently and keep the surface consistently moist until seedlings emerge, usually within a few weeks. Thin them as they grow, leaving about 8–12 inches (20–30 cm) between plants or small clumps.
To plant a division or nursery-grown plant, dig a hole large enough to spread out its roots. Set it at the same depth it grew previously, with the crown at soil level, then firm the soil and water thoroughly. Keep the soil evenly moist while plants establish; afterward, water during prolonged dry spells. A light mulch helps retain moisture, but keep it off the crowns. You can also grow garlic chives in a pot with drainage holes and potting mix. Remove flower heads before they set seed if you do not want new plants appearing nearby: garlic chives can self-sow readily.
Growth Timeline
- Germination 7–21 days
- Seedlings indoors 3–8 weeks
- Growing in the garden 60–90 days
- Harvest 18–28 weeks
Planting Calendar
- Start seeds indoors: 6–8 weeks before the last frost
- Sow outdoors: from 2 weeks before to 2 weeks after the last frost
- Plant outdoors: from the last frost until 2 weeks after
- Germination: 7–21 days
- Start indoors: Feb 13 – Mar 5
- Sow outdoors: Mar 27 – Apr 30
- Plant out: Apr 10 – Apr 30
- Harvest: Jun 9 – Aug 19
Care
Care Calendar
- Feed · Mar 27 – Apr 30
Top-dress established clumps with compost in spring. - Divide · Mar 27 – May 14
Split crowded clumps every three to four years and replant the divisions. - Deadhead · Aug 16 – Oct 17
Remove fading flower heads before they set seed to prevent unwanted seedlings.
Watering
Keep the soil evenly moist while garlic chives are becoming established. Water when the top inch of soil feels dry, soaking the root zone rather than giving the leaves a light sprinkle. Once established, plants tolerate short dry spells, but regular moisture produces more tender leaves and better regrowth after cutting. In dry weather, about 1 inch of water per week from rain or irrigation is a useful starting point; adjust for heat, soil type, and how quickly the ground dries. Containers dry out faster and may need checking every day during hot weather. Water at the base of the clump if possible, preferably in the morning, so foliage does not stay wet overnight. Avoid constantly soggy soil: garlic chives grow best with good drainage, and waterlogged roots can decline. Reduce watering when growth slows in cool weather, without letting young plants dry out completely.
Pruning
Remove yellow, damaged, or dead leaves at the base to keep the clump tidy. For a fuller reset during active growth, cut established foliage back to about 1–2 inches above the soil; fresh leaves should emerge from the crown. Do not repeatedly cut a newly planted clump before it has had time to establish. Garlic chives produce white flower clusters, usually in late summer. The flowers are edible, but their seeds can spread readily. Snip off spent flower heads before seeds mature if you do not want seedlings throughout the garden. If you want to collect seed, leave only a few heads and watch them closely. In late fall or early spring, clear away collapsed, dead foliage without damaging emerging shoots. Divide an overcrowded clump every few years to restore vigorous growth, replanting healthy sections with room for air to circulate.
Weeding
Keep the area around young garlic chives free of weeds until the clumps fill in. Weeds compete for water, nutrients, and light, and dense growth around the leaves can reduce airflow. Hand-pull small weeds after rain or watering, when roots release more easily, and work gently near the chives’ shallow roots. If you use a hoe, keep it shallow and away from the crown. Check a new patch carefully before pulling narrow, grasslike seedlings: volunteer garlic chives can resemble weeds, though a crushed leaf has a distinctive garlicky smell. Remove unwanted garlic chive seedlings promptly if flower heads were allowed to set seed. In containers, pull weeds while they are small so their roots do not become tangled with the chives. A light mulch can suppress new weeds, but continue inspecting the bed regularly; persistent perennial weeds are easiest to remove before they become established within a clump.
Mulching
Apply a light layer of organic mulch around garlic chives to slow evaporation and discourage weeds. About 1–2 inches of shredded leaves, clean straw, or fine bark is usually enough; in a well-kept bed, a layer of compost can serve a similar purpose while gradually enriching the soil. Leave a small gap around each crown rather than burying the bases of the leaves. Mulch piled against the plant can hold excess moisture and make it harder to spot problems. Refresh the layer when it thins, especially after weeding or dividing clumps. In cold regions, a loose covering after the ground begins to freeze may help protect crowns from repeated freezing and thawing; pull it back as new shoots appear in spring. Where summers are hot and dry, mulch also keeps the root zone cooler. Use weed-free material, and avoid letting a thick, matted layer block new growth.
Fertilizing
Garlic chives generally need modest feeding, especially in soil improved with compost. Before planting, mix finished compost into the bed. For established clumps, spread a thin layer of compost around the plants in spring, keeping it off the crowns, then water it in. If growth is pale or slow despite adequate light and moisture, a light application of a balanced fertilizer according to its label can help. Plants cut frequently may benefit from another modest feeding during the growing season, particularly in containers, where nutrients wash out faster. Avoid heavy doses of nitrogen: they can encourage soft, lush growth without improving the plant’s overall health. Do not fertilize dry soil, and do not place concentrated fertilizer directly against stems or roots. Healthy green leaves and steady regrowth are better guides than a fixed feeding schedule. If soil is already fertile, additional fertilizer may not be needed.
Pest Management
Check the leaves and bases of clumps regularly for damage. Garlic chives are often relatively trouble-free, but thrips can leave silvery streaks, aphids may gather on tender growth, and allium pests such as leafminers can occur in some regions. Wash off small aphid infestations with water; remove badly affected leaves and follow local guidance for any regulated allium pest. Fine insect netting can help exclude flying pests if it is installed before they reach the crop. Avoid spraying open flowers, which attract pollinators. Good drainage, spacing, and watering at soil level help limit problems associated with persistently damp foliage. Remove badly diseased leaves, and do not leave infested plant debris beside the bed. Rotate garlic chives away from areas where onions, garlic, or leeks suffered serious soilborne problems. Identify a pest before treating it, since damaged leaves can also result from drought or weather.
Harvesting
Begin harvesting once the clump is well established and has enough leaves to regrow. Snip leaves with clean scissors about 1–2 inches above the soil, taking a few from each clump or cutting one mature clump back at a time. Leave newly planted divisions largely unharvested until they are growing strongly. During active growth, leaves can be cut repeatedly as they recover; slow down if regrowth becomes weak, and allow plants time to replenish their reserves before winter. Pick leaves while young and tender for the best texture and garlicky flavor. Unopened flower buds and open flowers are also edible; harvest flowers before they set seed, especially if you want to prevent self-sowing. Wash and dry the harvest, then use it fresh in salads, eggs, soups, or as a garnish. Add it near the end of cooking to preserve its flavor. Refrigerate cut leaves for short-term use or freeze them chopped.
Growing in Containers
Grows well in a pot of at least 3 litres (0.8 US gallons), with drainage holes. Can be grown indoors as a houseplant.
Propagation
From seed
- Sow seeds in spring in moist, well-drained seed-starting mix or prepared soil.
- Cover seeds lightly with soil.
- Keep the soil evenly moist until seedlings emerge.
- Thin or transplant seedlings to give each clump room to grow.
By division
- Lift an established clump in spring or early fall.
- Separate it into smaller sections, each with roots and several shoots.
- Replant the sections at their original depth.
- Water thoroughly and keep the soil moist while they establish.
Companion Plants
Good neighbors
- Carrots: Gardeners commonly grow garlic chives near carrots because their onion scent may help confuse carrot rust flies.
Keep apart from
- Beans: Traditional companion-planting advice keeps alliums away from beans because they may inhibit bean growth, although evidence is limited.
- Peas: Traditional companion-planting advice keeps alliums away from peas because they may inhibit pea growth, although evidence is limited.
Common Problems
- Yellowing leaves
- Wilting
- Stunted growth
- Seedlings collapse at soil level
Onion fly is a small gray fly whose larvae, often called onion maggots, feed on onions and related alliums, including…
- Pale speckles or stippling
- Spots on leaves
- Curled or cupped leaves
- Distorted new growth
Thrips are tiny, slender insects in the order Thysanoptera. Many species feed on garden plants, including vegetables…
- Orange or rust-colored spots
- Spots on leaves
- Yellowing leaves
- Leaves dropping
Rust is a group of plant diseases caused by fungi in the order Pucciniales, not a single species. Different rust fungi…
- Winding tunnels in leaves
- Spots on leaves
- Leaves dropping
Leaf miners are the larvae of several kinds of flies, moths, beetles, and sawflies, rather than a single species with…
- Rust and downy mildew: Humid conditions and crowded foliage can encourage these fungal diseases. Improve airflow and remove affected leaves.
- Thrips and aphids: These insects can damage leaves, especially on stressed plants. Check new growth regularly.
- Root or crown rot: Poorly drained, persistently wet soil can cause plants to decline.
- Unwanted seedlings: Garlic chives self-seed readily if spent flower heads are left in place.
Varieties
A widely sold selection grown for its broad, flat, garlic-flavored leaves.
- broad leaves
- vigorous
More about varieties
- ‘Geisha’: A broad-leaved cultivar grown for its substantial, garlic-flavored leaves.
- ‘Monstrosum’: A large-leaved selection with wider foliage than typical garlic chives.
- ‘Green Belt’: A vigorous, broad-leaved selection commonly grown for repeated harvests.
Health Benefits
Garlic chives are best regarded as a flavorful vegetable, not a treatment for illness. Their leaves provide small amounts of fiber and nutrients, including vitamin K, vitamin C, and carotenoids. The amounts you get depend on the serving size and how the leaves are prepared. Using garlic chives to season food can add flavor without relying as heavily on salt.
Like other alliums, garlic chives contain sulfur-containing compounds that contribute to their garlic-like aroma. Laboratory studies have investigated these compounds and plant extracts for antioxidant and antimicrobial activity, but those findings do not establish that eating ordinary portions prevents infections, lowers blood pressure, or treats disease. Garlic chives also have a history of use in East Asian food traditions and traditional remedies, particularly for digestive complaints; clinical evidence for specific medicinal benefits remains limited.
Most people can enjoy the leaves, buds, and flowers as food. Anyone with an allium allergy should avoid them. If you take warfarin, keep your intake of vitamin-K-containing foods reasonably consistent rather than making sudden dietary changes. Wash harvested leaves, and introduce them in modest amounts if alliums tend to upset your stomach. For everyday wellness, their clearest benefit is helping make a varied diet more appealing.
Fun Facts
- Garlic chives have flat leaves; common chives have hollow, round leaves.
- Their white, star-shaped flowers attract pollinators.
- The unopened flower buds and open flowers are edible.
- Despite their garlic-like taste, the leaves—not a large bulb—are the usual harvest.
- Garlic chives are perennial and can spread by self-seeding.
Notice an error or have a question about Garlic Chives? Contact us